[ITEM]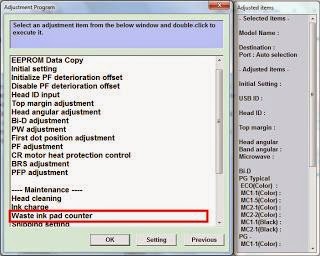
 [/ITEM]
29.01.2019
86
Epson L100 Waste Ink Pad Resetter L210 3,6/5 817 reviews
Reset Waste Ink Pad Counter for Epson L110, L210, L300, L350 and L355. Download the Utility.Use WinRar to extract the file. Once extracted and before you begin, make sure your printer’s driver are already installed on the computer.
The Epson L200 and similar ink tank models are great, the ink replacements are very efficient and let you print much more for the money it costs replacing them. The big flaw is the waste ink pad. The printer has a limited amount of times that it can clean the printer's nozzles and do a power ink flush to clean the printer heads. Once the printer reaches it's limits it's software will block you from printing on any computer. Now this is to protect the waste ink pad from overflowing with waste ink but the printer is designed in a way so that it is very hard to replace it. First you need a software that is available online from many sites to reset the waste ink pad error counter on your printer, I only found it available for PC from this link: and after that you can follow this guide and even look for youtube videos on how to do this.
• 1 Answer SOURCE: I modified a little what Worldvet had done. I opened the door as if to change the ink cartridges. I first used a pair of needle nosed pliers and carefully took out the sponge type pad which is along bottom of the printhead travel lane. Xprog 53 download.
One will see the two center plactic guides within this lane. The sponge is very delicate, so be very gentle in removing it. It has ink residue in it so use gloves if necessary and upon removal place the sponge on a paper towel folded in triplicate so the ink does not bleed through the towel. Remember to what position it was before removal, so there is no problem when you try to replace the sponge after cleaning. The second sponge I removed as follows: With the power on, I pressed the ink cartridge removal light (red) (far left) once.
This moved the print head to the 'far left', before the position to change cartridges. Kirgizcha uchkul sozdor. With the power still on and the printhead to the far left, I was able to very gently (with the same needlenose Pliers) remove the sponge under where the printhead was parked.
It too is very delicate and be careful not to rip it. It too, one will find, has two plastic slots on the botton which the sponge will have to be returned into. I then turned the printer off, which caused the printer head to return to the parked position. I took both sponges, and with Alcohol (Pharmacy type), I placed the sponges in a disposable plastic bowl and filled it with the alcohol. I gently used the needle nosed pliers (Closed) as a device to gently press on the sponges which were submerged into the alcohol. I continued to alternate up and down the sponge pads, causing the alcohol to dilute and clean the pads. When the alcohol became saturated with the ink from the pads, I took the pads out of the alcohol bowl and placed the pads on a triple folded paper towel so the remaining ink would not bleed through anything.
I then took the bowl of alcohol/ink and while I flushed the toilet and the water was going down, I emptied the alcohol down the middle of the water spout as the toilet water was completing its flush. This keeps any ink from touching any porcelion. I then refilled the plastic bowl again with fresh alcohol and resubmersed the pads, just incase there was any ink still left in them. Upon pressing on the pads and the alcohol remained clear (indicating all the ink was removed) I again used another set of paper towels, trippled, and placed the pads onto the paper towels, and squezzed them dry. I disposed of the alcohol the same as before. I then, first replaced the large pad onto the printhead travel lane, back into the same position, being careful that the holes and slots fits back into its proper position and the edges are tucked under the proper hooks (little plastic hooks attached to the side of the travel lane).
Upon reinstallation I pressed gently on the pad to make sure it was secure. Replacing the second pad, I again turned on the printer and pressed the ink replacement light (red), same as before, causing the printhead to travel to the far left as before. I then very carefully replaced the second pad into the slot from which it came from. After I made sure the second pad was secure in its proper position, I pressed the ink replacement light twice, causing the printhead to return back to the parking position. I had already reset the counter, so that was not neccessary.
I returned to the computer and printed a test page to make sure the printer was working properly, at which time it was, so I therefore returned to what I was doing and the Service Warning was cleared. My fingers got a little ink; but what the heck, soap will take care of that! Good for another 20,000 pages.
- Author: admin
- Category: Category
Search
Top Articles
- Telecharger Processim Gratuit
- Copie De Windows 7 Pas Authentique Cracked
- Otveti Na Testi Po Sanminimumu Dlya Provodnikov
- Tunerpro Rt Registration Key
- Programmi Dlya Draft Syurveya Bezplatno
- Download Contoh Undangan Pernikahan Cdr
- Haansoft Hangul 2007 2007 Iso
- Championship Manager 03 04 Training Schedules
- Download Corel Draw X4 With Crack
- Mysql Recovery Toolbox Zip Registration Key
- Raeth Band Songs Download Free
- Index Of Photoshop Cs6 Keygen
- Antares Autotune 7 Ilok Crack Protools
- Drajver Dlya Kitajskoj Videokarti
- Obrazec Firmennogo Blanka Ip Belarusj
Epson L100 Waste Ink Pad Resetter L210 3,6/5 817 reviews
Reset Waste Ink Pad Counter for Epson L110, L210, L300, L350 and L355. Download the Utility.Use WinRar to extract the file. Once extracted and before you begin, make sure your printer’s driver are already installed on the computer.
The Epson L200 and similar ink tank models are great, the ink replacements are very efficient and let you print much more for the money it costs replacing them. The big flaw is the waste ink pad. The printer has a limited amount of times that it can clean the printer's nozzles and do a power ink flush to clean the printer heads. Once the printer reaches it's limits it's software will block you from printing on any computer. Now this is to protect the waste ink pad from overflowing with waste ink but the printer is designed in a way so that it is very hard to replace it. First you need a software that is available online from many sites to reset the waste ink pad error counter on your printer, I only found it available for PC from this link: and after that you can follow this guide and even look for youtube videos on how to do this.
• 1 Answer SOURCE: I modified a little what Worldvet had done. I opened the door as if to change the ink cartridges. I first used a pair of needle nosed pliers and carefully took out the sponge type pad which is along bottom of the printhead travel lane. Xprog 53 download.
One will see the two center plactic guides within this lane. The sponge is very delicate, so be very gentle in removing it. It has ink residue in it so use gloves if necessary and upon removal place the sponge on a paper towel folded in triplicate so the ink does not bleed through the towel. Remember to what position it was before removal, so there is no problem when you try to replace the sponge after cleaning. The second sponge I removed as follows: With the power on, I pressed the ink cartridge removal light (red) (far left) once.
This moved the print head to the 'far left', before the position to change cartridges. Kirgizcha uchkul sozdor. With the power still on and the printhead to the far left, I was able to very gently (with the same needlenose Pliers) remove the sponge under where the printhead was parked.
It too is very delicate and be careful not to rip it. It too, one will find, has two plastic slots on the botton which the sponge will have to be returned into. I then turned the printer off, which caused the printer head to return to the parked position. I took both sponges, and with Alcohol (Pharmacy type), I placed the sponges in a disposable plastic bowl and filled it with the alcohol. I gently used the needle nosed pliers (Closed) as a device to gently press on the sponges which were submerged into the alcohol. I continued to alternate up and down the sponge pads, causing the alcohol to dilute and clean the pads. When the alcohol became saturated with the ink from the pads, I took the pads out of the alcohol bowl and placed the pads on a triple folded paper towel so the remaining ink would not bleed through anything.
I then took the bowl of alcohol/ink and while I flushed the toilet and the water was going down, I emptied the alcohol down the middle of the water spout as the toilet water was completing its flush. This keeps any ink from touching any porcelion. I then refilled the plastic bowl again with fresh alcohol and resubmersed the pads, just incase there was any ink still left in them. Upon pressing on the pads and the alcohol remained clear (indicating all the ink was removed) I again used another set of paper towels, trippled, and placed the pads onto the paper towels, and squezzed them dry. I disposed of the alcohol the same as before. I then, first replaced the large pad onto the printhead travel lane, back into the same position, being careful that the holes and slots fits back into its proper position and the edges are tucked under the proper hooks (little plastic hooks attached to the side of the travel lane).
Upon reinstallation I pressed gently on the pad to make sure it was secure. Replacing the second pad, I again turned on the printer and pressed the ink replacement light (red), same as before, causing the printhead to travel to the far left as before. I then very carefully replaced the second pad into the slot from which it came from. After I made sure the second pad was secure in its proper position, I pressed the ink replacement light twice, causing the printhead to return back to the parking position. I had already reset the counter, so that was not neccessary.
I returned to the computer and printed a test page to make sure the printer was working properly, at which time it was, so I therefore returned to what I was doing and the Service Warning was cleared. My fingers got a little ink; but what the heck, soap will take care of that! Good for another 20,000 pages.
Search
Top Articles
- Telecharger Processim Gratuit
- Copie De Windows 7 Pas Authentique Cracked
- Otveti Na Testi Po Sanminimumu Dlya Provodnikov
- Tunerpro Rt Registration Key
- Programmi Dlya Draft Syurveya Bezplatno
- Download Contoh Undangan Pernikahan Cdr
- Haansoft Hangul 2007 2007 Iso
- Championship Manager 03 04 Training Schedules
- Download Corel Draw X4 With Crack
- Mysql Recovery Toolbox Zip Registration Key
- Raeth Band Songs Download Free
- Index Of Photoshop Cs6 Keygen
- Antares Autotune 7 Ilok Crack Protools
- Drajver Dlya Kitajskoj Videokarti
- Obrazec Firmennogo Blanka Ip Belarusj